
How to Track Expenses in QuickBooks Online
Tracking business expenses in QuickBooks Online is one of the most important things you can do to keep accurate financial records, understand where your money is going, prepare for tax season, and avoid missing legitimate business deductions.
Every business expense that goes unrecorded can potentially mean overstated taxable income. And every transaction that is categorized incorrectly can create additional work at tax time.
After more than 30 years of preparing tax returns and helping business owners with accounting, I’ve seen the same problems repeatedly: shoeboxes full of receipts, hundreds of uncategorized bank transactions, personal and business expenses mixed together, duplicate transactions, and legitimate deductions that may be overlooked because the business owner didn’t maintain adequate records.
The good news is that QuickBooks Online can make expense tracking much easier, if it’s set up and used correctly.
In this complete 2026 guide, you’ll learn how to:
- Connect your business bank and credit card accounts to QuickBooks Online.
- Import and review bank transactions.
- Categorize business expenses correctly.
- Record expenses manually when necessary.
- Attach and organize receipts.
- Create bank rules to automate recurring transactions.
- Split transactions between multiple expense categories.
- Reconcile your accounts.
- Run reports to understand where your money is going.
- Avoid common bookkeeping mistakes.
- Maintain better records for tax preparation.
Whether you’re just getting started with QuickBooks Online or you’ve been using it for years and know your books need some attention, this guide will walk you through the process step by step.
CPA TIP
The best bookkeeping system isn’t necessarily the most complicated one. It’s the system you can maintain consistently. Reviewing transactions for 10 to 15 minutes each week is usually much easier than trying to clean up an entire year of bookkeeping before the tax deadline.
Quick Answer: How Do You Track Expenses in QuickBooks Online?
The simplest way to track expenses in QuickBooks Online is to connect your business bank accounts and credit cards, allow QuickBooks to import transactions automatically, review and categorize those transactions regularly, attach receipts when appropriate, and reconcile each account against the monthly bank or credit card statement.
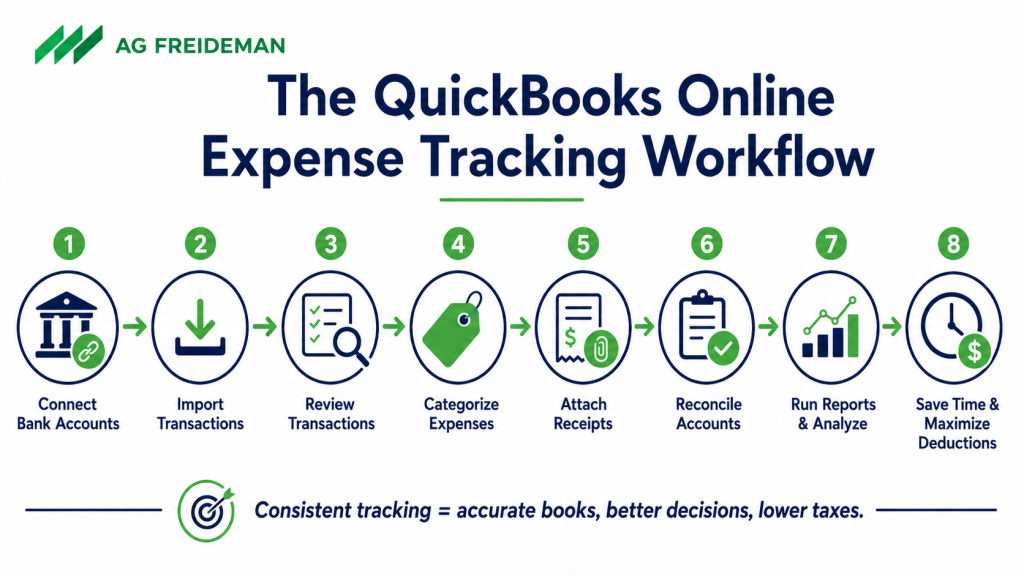
A typical expense-tracking workflow looks like this:
Connect Bank Accounts → Import Transactions → Review Transactions → Categorize Expenses → Attach Receipts → Reconcile Accounts → Run Financial Reports
For most small businesses, bank feeds will handle the majority of transaction imports. However, cash purchases, reimbursements, and certain other transactions may need to be entered manually.
The key is not simply getting transactions into QuickBooks. The real goal is making sure transactions are:
- Complete.
- Accurate.
- Properly categorized.
- Supported by appropriate records.
- Reconciled to the actual financial accounts.
Why Tracking Business Expenses Matters
Expense tracking is about much more than getting ready for tax season.
Proper bookkeeping helps you understand whether your business is actually profitable, how much cash you’re spending, which expenses are increasing, where you may be overspending, and how much money may be available for taxes, payroll, debt payments, or reinvestment.
1. You Can Avoid Missing Potential Tax Deductions
Generally, ordinary and necessary business expenses may be deductible when allowed under applicable tax law.
If an expense is never recorded, forgotten, or mixed with personal transactions, it may be overlooked during tax preparation.
Consider a simplified example.
Suppose your business has:
| Item | Amount |
|---|---|
| Gross revenue | $200,000 |
| Actual business expenses | $80,000 |
| Potential net business income before other adjustments | $120,000 |
Now suppose $20,000 of legitimate business expenses were never properly recorded. Your bookkeeping records could incorrectly show $140,000 of net income instead of $120,000.
The actual tax impact depends on numerous factors, including your entity type, other income, available deductions, filing status, and applicable federal and state tax rules. But the principle is simple: incomplete bookkeeping can lead to incomplete tax reporting.
CPA TIP
Don’t wait until tax season to determine whether a transaction was business-related. The longer you wait, the harder it becomes to remember what you purchased, who attended a business meal, why you traveled, or what business purpose an expense served.
2. You Can Better Support Your Tax Return
Good bookkeeping creates an organized record of your business transactions.
QuickBooks can help you maintain information such as:
- Transaction date.
- Vendor or payee.
- Amount.
- Expense category.
- Payment account.
- Memo or description.
- Customer or project, when applicable.
- Class or location, depending on your subscription and setup.
- Attached receipts or supporting documents.
QuickBooks itself doesn’t determine whether an expense is legally deductible. However, accurate bookkeeping can help you and your tax professional identify transactions and maintain supporting records.
3. You Get More Useful Financial Statements
If transactions are categorized incorrectly, your financial statements may be misleading.
For example, imagine that:
- Equipment purchases are categorized as office supplies.
- Loan payments are entirely categorized as interest expense.
- Owner distributions are recorded as business expenses.
- Credit card payments are duplicated as additional expenses.
- Transfers between bank accounts are categorized as income.
Your Profit and Loss statement may look complete, but it won’t necessarily be accurate.
Correct expense tracking makes financial reports more useful for answering questions such as:
- Is my business profitable?
- How much am I spending on advertising?
- Are payroll costs increasing?
- How much do I pay independent contractors?
- Are software subscriptions getting out of control?
- How does this month compare with last month?
- How does this year compare with last year?
Before You Start: Set Up QuickBooks Online Correctly
Before you start categorizing hundreds of transactions, make sure the foundation is correct.
A clean setup now can prevent hours of bookkeeping cleanup later.
Your QuickBooks Expense-Tracking Checklist
Before moving forward, review the following:
- Use a separate business bank account whenever appropriate.
- Use a dedicated business credit card when possible.
- Connect all relevant business financial accounts.
- Review your Chart of Accounts.
- Remove or make inactive unnecessary duplicate accounts.
- Establish appropriate expense categories.
- Set up vendors correctly.
- Decide how receipts will be captured and stored.
- Determine who will review transactions.
- Establish a weekly and monthly bookkeeping schedule.
Step 1: Connect Your Bank Accounts and Credit Cards to QuickBooks Online
For most small businesses, connecting business bank and credit card accounts is the foundation of expense tracking.
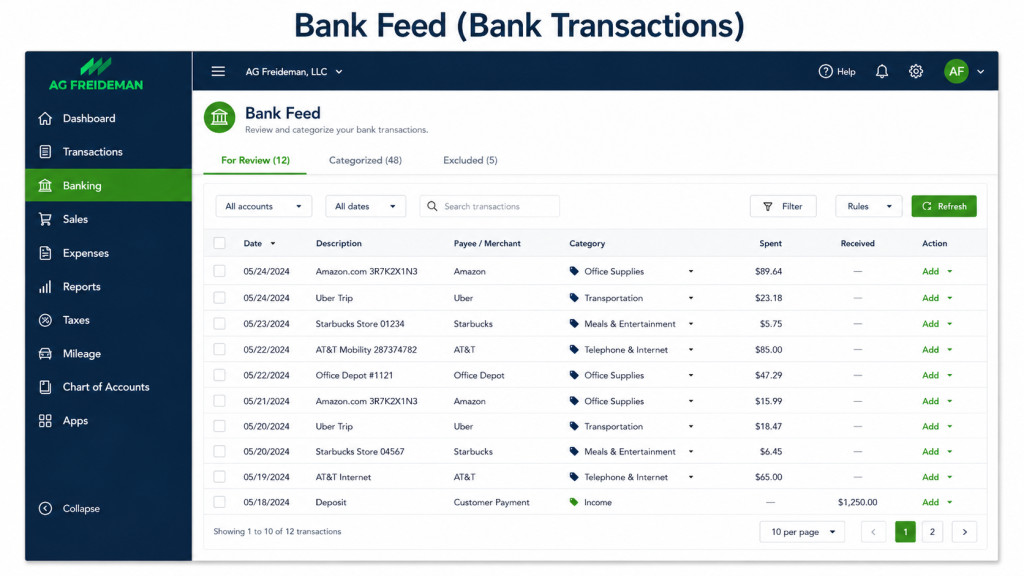
Once connected, QuickBooks can import transaction data from supported financial institutions. Instead of manually entering every purchase, you can review imported transactions and determine how they should be handled in your books.
How to Connect a Bank Account in QuickBooks Online
Depending on your QuickBooks interface and subscription, menu names may vary slightly. Generally, you’ll:
- Open QuickBooks Online.
- Go to Transactions or the bank transactions area.
- Select Bank Transactions.
- Choose the option to Link Account or connect an account.
- Search for your bank or financial institution.
- Follow the prompts to securely authenticate your account.
- Select the business accounts you want to connect.
- Choose the appropriate QuickBooks account for each connection.
- Select the available starting date for imported transactions.
- Review imported transactions before adding them to your books.
IMPORTANT
Connecting a bank feed doesn’t mean every downloaded transaction should automatically be treated as a new expense. Some transactions may be transfers, credit card payments, loan payments, owner contributions, distributions, refunds, or matches to transactions already recorded in QuickBooks.
Should You Automatically Add Bank Transactions?
QuickBooks offers automation features that can reduce manual bookkeeping work. However, automatically adding transactions without appropriate review can create problems.
For simple and predictable recurring transactions, automation can be useful.
Examples might include:
- Monthly software subscriptions.
- Internet service.
- Office rent.
- Certain insurance payments.
- Regular telephone expenses.
But use additional caution with transactions involving:
- Loan payments.
- Credit card payments.
- Transfers.
- Owner contributions.
- Owner distributions.
- Payroll.
- Sales tax.
- Large equipment purchases.
- Reimbursements.
- Mixed business and personal transactions.
CPA TIP
Automation should eliminate repetitive work, not eliminate judgment. A transaction being downloaded from your bank doesn’t tell QuickBooks what the transaction actually represents for accounting or tax purposes.
Step 2: Review Transactions in the Bank Feed
After connecting your bank and credit card accounts, imported transactions generally appear in the bank transactions area for review.
Your job is to determine what happened with each transaction.
A downloaded transaction might need to be:
- Added as a new expense.
- Matched to an existing transaction.
- Recorded as a transfer.
- Split between multiple categories.
- Assigned to an asset account.
- Recorded as a loan payment.
- Categorized as an owner transaction.
- Excluded if it truly doesn’t belong in the accounting records.
Don’t Just Click “Add” Without Reviewing the Transaction
One of the most common QuickBooks mistakes is blindly accepting suggested categories.